
Search results
There is a page named "Mortimer's Cross" on Wikipedia
 Wakefield St. Albans Mortimer's Cross London Calais Gloucester The Battle of Mortimer's Cross was fought on 2 February 1461 near Kingsland, Herefordshire...13 KB (1,487 words) - 18:01, 9 June 2024
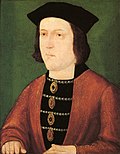 Wakefield in December 1460. After defeating Lancastrian armies at Mortimer’s Cross and Towton in early 1461, he deposed King Henry VI and took the throne...51 KB (6,015 words) - 20:45, 10 August 2024
 "sun dog" before his victory at the Battle of Mortimer's Cross in 1461 (see also Battle of Mortimer's Cross#Parhelion). It also had significance in alchemy...10 KB (761 words) - 02:16, 2 August 2024
 ISBN 978-0-319-22953-8 Mortimers Cross Mill website Historic England - Water mill and quarry at Mortimer's Cross Historic England - Mortimer's Cross Mill 52°16′08″N...1 KB (90 words) - 14:56, 29 November 2023
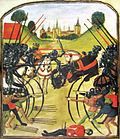 2 February 1461, he decisively defeated the Lancastrian armies at Mortimer's Cross, and the captured Owen Tudor, husband to Henry V's widow Catherine...186 KB (21,130 words) - 15:53, 11 August 2024
 Printed for the Camden society, 1852 The prelude to the Battle of Mortimer's Cross in Herefordshire, England in 1461 is supposed to have involved the...22 KB (2,639 words) - 06:53, 7 July 2024
 Wakefield St. Albans Ludford Bridge Mortimer's Cross Northampton London Harlech Kingston upon Hull Berwick upon Tweed Worksop York Calais Coventry Chester...32 KB (3,863 words) - 23:44, 24 July 2024
 Battle of St Albans in 1455, Battle of Wakefield in 1460, Battle of Mortimer's Cross in 1461 and the Battle of Towton. He died on 1 May 1461, beheaded at...7 KB (707 words) - 09:15, 18 May 2024
 heavy defeat on the royalists under Jasper Tudor at the Battle of Mortimer's Cross. Edward made his way to London, where he met Warwick, who had just...53 KB (6,538 words) - 19:19, 16 August 2024
 had taken part in before the Battle of Bosworth was the Battle of Mortimer's Cross in February 1461, where he lost the battle to the future king, Edward...21 KB (2,753 words) - 23:22, 9 July 2024
 area centuries after the engagement. Towton Wakefield Northampton Mortimer's Cross St. Albans London York In 1461 England was in the sixth year of the...54 KB (6,459 words) - 18:01, 9 June 2024
 Battle of Mortimer's Cross by Edward of York. On 2 February, Owen Tudor was captured and beheaded at Hereford. His head was placed on the market cross there...16 KB (2,126 words) - 18:25, 3 July 2024
 defect to the Yorkist cause and fought for Edward at the Battles of Mortimer's Cross (1461), Barnet (1471) and Tewkesbury (1471). He was subsequently invested...5 KB (440 words) - 02:01, 22 June 2024
- Tudor. On 2 February, Edward defeated Tudor's army at the Battle of Mortimer's Cross. Warwick, with the captive King Henry in his train, meanwhile moved...15 KB (1,899 words) - 23:30, 13 August 2024
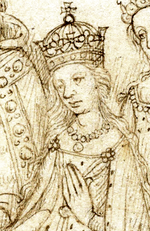 1461, when he was executed by the Yorkists following the Battle of Mortimer's Cross in Herefordshire. Their surviving sons were given earldoms by Catherine's...19 KB (2,071 words) - 15:03, 20 July 2024
 "Nine things we learned from Bob Mortimer's Desert Island Discs". BBC. Retrieved 9 June 2020. Bob Mortimer at IMDb Bob Mortimer at British Comedy Guide...28 KB (2,512 words) - 12:06, 16 August 2024
 of Mortimer's person was initially granted to Arundel, but in August 1384, at the behest of Joan of Kent, the mother of King Richard II, Mortimer's wardship...16 KB (1,734 words) - 14:53, 8 July 2024
 Sarajevo is founded by the Ottomans. 1461: 2 February – Battle of Mortimer's Cross: Yorkist troops led by Edward, Duke of York defeat Lancastrians under...32 KB (3,519 words) - 14:34, 1 August 2024
 Hereford, six miles west of Leominster, and 2 miles southwest of the Mortimer's Cross. According to the 2001 census, the parish population was 769, consisting...8 KB (625 words) - 16:31, 6 July 2024
 in which Mortimer's widow Joan petitioned Edward III for the return of her husband's body so she could bury it at Wigmore Abbey. Mortimer's lover Isabella...30 KB (3,533 words) - 13:42, 12 July 2024


- English Wikipedia has an article on: Mortimer's Cross Wikipedia Mortimer's Cross A small village at a crossroads in Aymestrey parish, Kingsland parish
- ii. 466, which latter dates the birth 29 April 1286). Mortimer's uncle was Roger de Mortimer (lit) [q. v.] of Chirk. His father, Edmund, died before
- anybody be so stupid! Elaine: But Mortimer, you're going to love me for my mind, too. Mortimer: One thing at a time! Mortimer: Yeah, yeah, I know that bromide
- with its corresponding increase in varied roles and responsibilities. Mortimer and Simmons outline three specific ways these two parts of socialization