Front panel
This article needs additional citations for verification. (December 2013) |


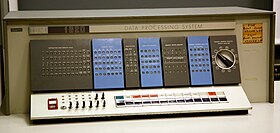
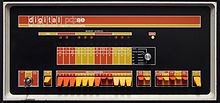
A front panel was used on early electronic computers to display and allow the alteration of the state of the machine's internal registers and memory. The front panel usually consisted of arrays of indicator lamps, digit[a] and symbol displays, toggle switches, dials, and push buttons mounted on a sheet metal face plate. In early machines, CRTs might also be present (as an oscilloscope, or, for example, to mirror the contents of Williams–Kilburn tube memory). Prior to the development of CRT system consoles, many computers such as the IBM 1620 had console typewriters.
Usually the contents of one or more hardware registers would be represented by a row of lights, allowing the contents to be read directly when the machine was stopped. The switches allowed direct entry of data and address values into registers or memory.
Details
On some machines, certain lights and switches were reserved for use under program control. These were often referred to as sense indicators, sense lights and sense switches. For example, the original Fortran compiler for the IBM 704 contained specific statements for testing and manipulation of the 704's sense lights and switches. These switches were often used by the program to control optional behavior, for example information might be printed only if a particular sense switch was set.
Operating systems made for computers with blinkenlights, for example, RSTS/E and RSX-11, would frequently have an idle task blink the panel lights in some recognizable fashion. System programmers often became very familiar with these light patterns and could tell from them how busy the system was and, sometimes, exactly what it was doing at the moment. The Master Control Program for the Burroughs Corporation B6700 mainframe would display a large block-letter "B" when the system was idle.[1]
Switches and lights required little additional logic circuitry and usually no software support, important when logic hardware components were costly and software often limited.
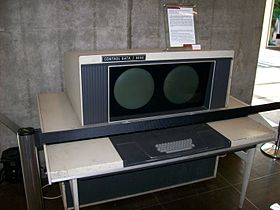
While other machines of its day had elaborate front panels to control them, the 6600 has only a dead start panel.[2] There is a dual CRT system console, but it is controlled by operating system code on a peripheral processor and neither controls nor displays the hardware directly.
Early microcomputers such as the 1975 Altair 8800 also relied on front panels, but since the introduction of the Apple II, TRS-80, and Commodore PET during the home computer boom of 1977, the vast majority of microcomputers came with keyboards and connections for TV screens or other monitors.
Common usage
An operator would use the front panel to bootstrap the computer, to debug running programs, and to find hardware faults.
Storage alteration and display
Many computers had controls, e.g., buttons, dials, keyboards, toggle switches, for entering addresses, controls for displaying the data at an address and controls for altering storage contents. These were typically used for booting and debugging.
Booting
Typically, the operator would have a written procedure containing a short series of bootstrap instructions to be hand-entered using, e.g., dials, keyboard, toggle switches. First, the operator would, e.g., press the address switch and enter the address. For easier entry and readout, on some computers (such as the DEC PDP-8 or MITS Altair 8800) binary digits were grouped into threes or fours on the front panel, with each group of lights or switches representing a single octal (between 0 and 7) or hexadecimal (between 0 and F) digit. Some[b] decimal computers, e.g., IBM 1620, used binary-coded decimal for memory addresses.
Next the operator would enter the value intended for that address. After entering several of these instructions (some computers had a deposit next button, which would deposit subsequent values in subsequent addresses, relieving the operator of needing to enter subsequent addresses), the operator would then set the starting address of the bootstrap program and press the run switch to begin the execution of the program. The bootstrap program usually read a somewhat longer program from punched paper-tape, punched cards, magnetic tape, drum or disk which in turn would load the operating system from disk.
Some machines accelerated the bootstrap process by allowing the operator to set the controls to contain one or two machine language instructions and then directly executing those instructions. Other machines allowed I/O devices to be explicitly commanded from the front panel (for example, "Read-In Preset" on the PDP-10 or the accessing of memory-mapped I/O devices on a PDP-11). Some machines also contained various bootstrap programs in ROM and all that was required to boot the system was to start it executing at the address of the correct ROM program.
Debugging
Front panels were often used to debug programs when operating support was limited and most programs were run in stand-alone mode. Typically a front-panel switch could cause the computer to single-step, that is run a single instruction and stop until the programmer pressed a button to execute the next instruction. An address stop could be set to stop a running program when it attempted to execute an instruction or access data at a specified address. The contents of registers and memory would be displayed in the front-panel lights. The programmer could read and alter register contents, change program instructions or data in memory or force a branch to another section of code.
When multiprogramming became the norm it was no longer acceptable to tie up an entire machine for debugging, except for special situations. Programs called debuggers were written which provided the programmer with the equivalent of the front-panel functions without requiring the entire machine.
Entertainment
For fun, bored programmers would create programs to display animated light shows. Front panels in the late 1960s and early 1970s were quite brightly colored. In the late 1970s and early 1980s, bootstrap ROMs became common. Since computers could use them to start themselves without operator intervention, most computers were built without a front switch panel. High-powered calculators, such as the HP 9830 based on ROM, were among the first computers to do away with front panels and operators.
Huge banks of "blinkenlights" and "blowenfuzen" were featured on TV and movies as the popular image of the "computer" during the 1950s to 1970. (A Burroughs B205 was used as a Hollywood prop for many of these shows.)
Example

The following procedure would bootstrap a PDP-8 system from an RK05 moving-head magnetic disk:
- Ensure that the machine is halted by lowering and raising the Halt switch; the front panel "RUN" light should then be off.
- Set the 12 data switches to 0030 (Octal address 30), depress the Load Address ("ADDR LOAD") switch. The address lights will change to "0030".
- Set the switches to 6743, raise the Deposit switch. The data lights will show this instruction.
- Set the switches to 5031, raise the Deposit switch. The data lights will show this instruction.
- Set the switches to 0030 (Octal address 30), depress the Load Address switch. The address lights will change back to "0030".
- Depress the Clear switch.
- Depress the Continue switch. The "RUN" light will illuminate and the operating system on the disk will be bootstrapped.
This process works by depositing a simple, two-instruction program in memory and executing it. The first instruction commands the disk controller to begin reading the disk from the current disk address into the current memory address. The second instruction is a JMP instruction that jumps to itself endlessly. When "Clear" is pressed, the disk controller's current disk address is set to sector 0 and its current memory address is set to memory location 0000. When the read is commanded, the program stored in disk sector 0 overlays the bootstrap program and, once the JMP instruction is overlaid, the disk program takes control of the machine.
Notes
References
- ^ "Burroughs B6700". retroComputingTasmania. Archived from the original on December 28, 2013. Retrieved Dec 27, 2013.
- ^ "Figure 6-1. Dead Start Panel" (PDF). Control Data - 6000 Series - Computer Systems (PDF). p. 6-3. Retrieved October 6, 2023.
